Inspiration:
|
Last semester I was really happy with how engaged my students were in the project. I credit the engagement to the authenticity of the essential question that drove that project. For this project it was important to me to have a clear motivation for why we would everything in the class.
A math teacher at our school studied aeronautics in college and we got to talking about flight. In the past I have seen other teachers do projects on flight and when I showed him some of their examples, we both got really excited. This is why I love looking through other teachers projects, because it's easy to get a new idea from somewhere else, or tweak it to your liking. In this case we used previous projects as an example and built from there. Based on our inspiration, I wanted to make kites with the students, and I was also thinking about balsa wood gliders. While researching I found X Company, which uses aeronautics to solve problems like internet access and power generation. These were authentic uses of aeronautical science and I found myself fascinated. |
The Loon project uses lighter-than-air craft to create an internet network in places where access is not practical. Image: X Project
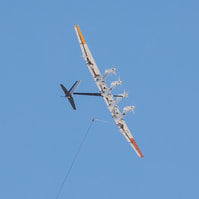
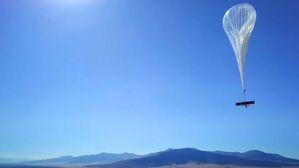
The Makani project launches an autonomous kite into the air which has wind turbines attached. At higher altitudes it catches better wind then is at ground level. Image: X Project
|
Description:
I knew we'd build both kites and gliders as we learned about aeronautical physics and applied their knowledge. For the end product I wanted for them to create something new. After some critique with other teachers at my school, I settled on the following essential question:
How might future challenges be managed, solved, or prevented using airborne solutions? |
Thinking about this question I found myself researching and getting excited about content so I knew that I had a good question. Ideally, the question for a project drives the content, meaning you teach the kids things because they need to know it in order to answer the question. In this case I went sort of backwards. I had a subject that I wanted to cover and found a way to make it into a project. I wonder what the benefits of one way over the other is.
In this project, students will build kites, then gliders, all the while researching and identifying future global challenges that they will live through in their adult life. They will then use what they learned to create a solution or strategy geared toward managing that challenge.
In this project, students will build kites, then gliders, all the while researching and identifying future global challenges that they will live through in their adult life. They will then use what they learned to create a solution or strategy geared toward managing that challenge.
This project will be broken into 3 segments: Kites, Gliders, and Airborne Solutions. In a sense, I have 3 projects to plan (yay!)
Part 1: Kites

Make a kite from scratch. Then, look up designs online and make one that is interesting.
|
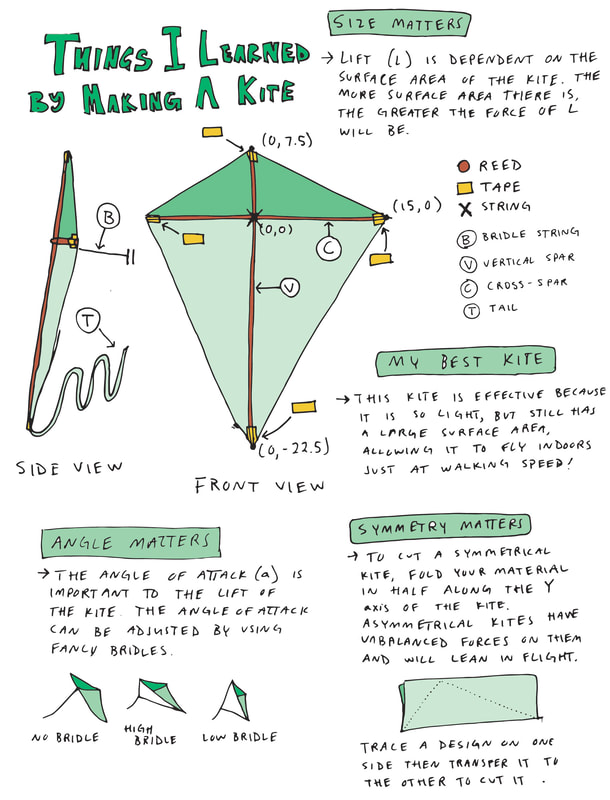
Write about what you learned while making kites. Use your notes and include a labelled diagram of your best kite.
|

Research a global challenge or risk. Make a kite that might help. Use designs you find online and your own creativity.
|
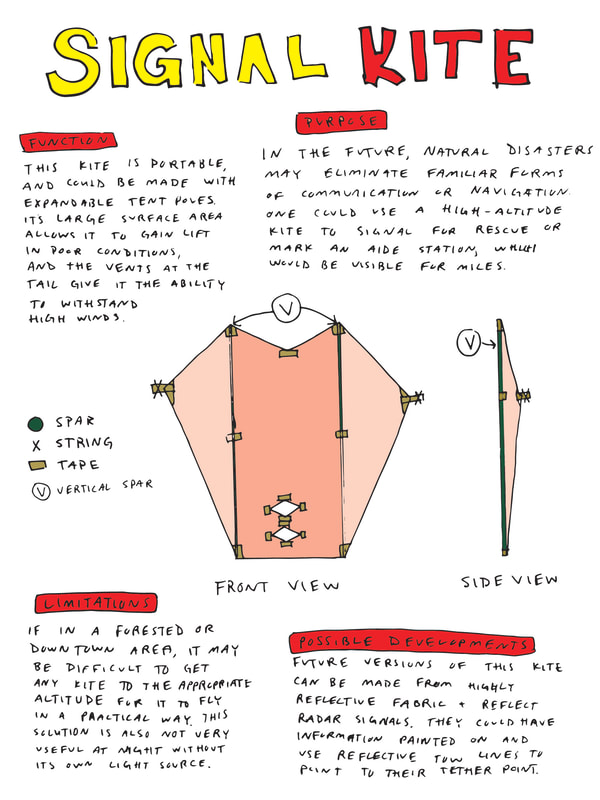
Write about your kite and how it's design makes it perfect for the global challenge you picked. Include a labelled diagram.
|
Resources for kites
Part 2: Gliders
Deliverables In Order
|
First, assemble a toy glider and try to make it better. Then make your own out of balsa wood.
|

Use what you learned to make a new glider, or plans online for a glider that looks interesting and make it.
|
Write about what you learned and make it into a poster that shows a diagram of the glider that you made
|
Design a prototype glider that might help a specific global issue.
|
Resources for Gliders
Week By Week Discussions: (the nitty gritty)
Week 1: Everybody makes a Kite
On the very first day of class I gave pairs of students a kite kit and a set of instructions for assembling it. They put the kites together and went out to try flying them. When they got back from their first flight I gave them an organizer to collect their thoughts on how things went. For the second day I asked them to make modifications to their kite or make a new one from scratch. I printed out a bunch of kite plans ranging from just pictures to full instructions.
What worked:
Starting the semester with experience is the way to go. It's great being able to give the class good news that yes, really, we are flying kites today. It brings everyone in and gets them involved from the beginning. This time I made sure to field questions about kites and flight from the class on the first day once they had returned from their first flight. These have been useful in guiding my lesson plans, because a lot of people asked similar questions.
What was surprising:
In planning this unit I had referenced a lot of websites and diagrams myself, so I decided to print a bunch of them out for the class to use. I had 10 diagrams and plans for the group to look at as they got ideas for modifying their kites. This turned out to be rocket fuel for their initial ideas. In the past I would have had the class look at ideas online or do their own research, but by having physical copies already printed and ideas I had vetted, the class started building really quickly. It was nice to have them printed so that I and the students could draw new ideas right on top of them. I also included one page with Spanish directions, which was not planned but ended up connecting with a few students who are bilingual. Later these documents served as great models for drawing kites, which everyone had to do for their assignment.
Never again:
It's great to get student work on the walls as soon as possible. I used to think that it was for the teacher to put these things up, but it really is for the students. They see that you are invested in their work and care about the project. It's also cool for the new class to shape the room. I never want to miss the opportunity to put up current student work in the class or halls.
Week 2: Learning from prototypes
This week everyone built a kite from scratch using plans that we found online. We tested and flew our kites in the field by our school with mixed success. For this
What worked:
I set up a critique system where students needed to have another group approve their plans before I gave them final approval. This really increased the overall quality of the plans and the degree to which students planned everything out. I also liked fostering a system of peer critique in the room.
What was surprising:
The materials I bought were not great. It turns out that using bamboo for vertical spars is totally fine but for horizontal they are too brittle. We figured this out with the class and had to get creative with solutions. It was unfortunate but also a good introduction to problem solving with the group.
Never again:
I thought that the students would have more trouble making the kites, but it turned out that they finished pretty quickly. Because I expected them to not have enough time, I decided to nix a reflection assignment. I'm upset that I did this because they missed an opportunity to document learning and record their thinking. In the future I don't want o neglect the reflection process.
Week 3: Planning final kite
This week we formed new partnerships and they began building with high quality materials kites that are meant to last. They rushed to finish this week so that they could take advantage of winds next week for testing.
What worked:
Since everyone had similar experiences making kites from before, most of the partnerships knew what they wanted to do on the first day. This made the class work pretty efficiently right from the beginning. Requiring that I sign off on all designs before building can commence was also a new thing for me. I liked to see the students take the time to make a thoughtful plan because it improves the overall quality of the projects. I will do this in the future
What was surprising:
All but one group assembled their kite by the end of the week. I was worried that this would result in disengaged groups that had finished everything but in reality most of the kites did not work very well on the first try. The groups really needed the extra time to tune and fix their kites and make them work their best. It's rewarding to have a project where you can't just wing it, but actually need to put in the time and effort to get results.
Never again:
For unknown reasons I asked the groups to change their designs between week 2 and week 3. This was dumb and I should have asked the groups to continue iterating on their best design from the previous weeks. Since some groups were starting a totally new design they didn't get as much time to refine their design as other groups. I far prefer seeing designs develop through drafts than feeling like students didn't get enough time to realize their idea.
Week 4: Building and testing final Kite
The last week of kites. I had the class finish the kites to be ready to fly on Wednesday. Thursday and Friday were spent making the final posters. There was a storm coming on Thursday and the wind picked up so we went out a second time and flew some more.
What worked:
Giving the class multiple opportunities to go and fly as a group was really fun. There is a lot of motivation when students see everyone else out there making their designs work. This is a way better deadline than an arbitrary due date: I prefer having something fun as a culminating event rather than just requiring everyone to hand something in.
What was surprising:
The kites worked really well! For me, I was authentically psyched and proud of the class to see them working their kites and getting airborne. The class was genuinely proud to achieve stable flight as well and I loved giving them the opportunity. It sounds a little strange to consider the functioning of the kites as something surprising, but I take it as evidence that I'm as much a learner as the class is. Some of their designs really pushed our understanding of what shapes can fly, and I enjoyed figuring it out with them.
Never again:
I only gave the class 1 opportunity to critique and refine their posters, and it kind of shows. I think that I need to set more clear expectations for the posters for next time so that the class keeps producing high quality work.
Week 5: Everybody builds a glider
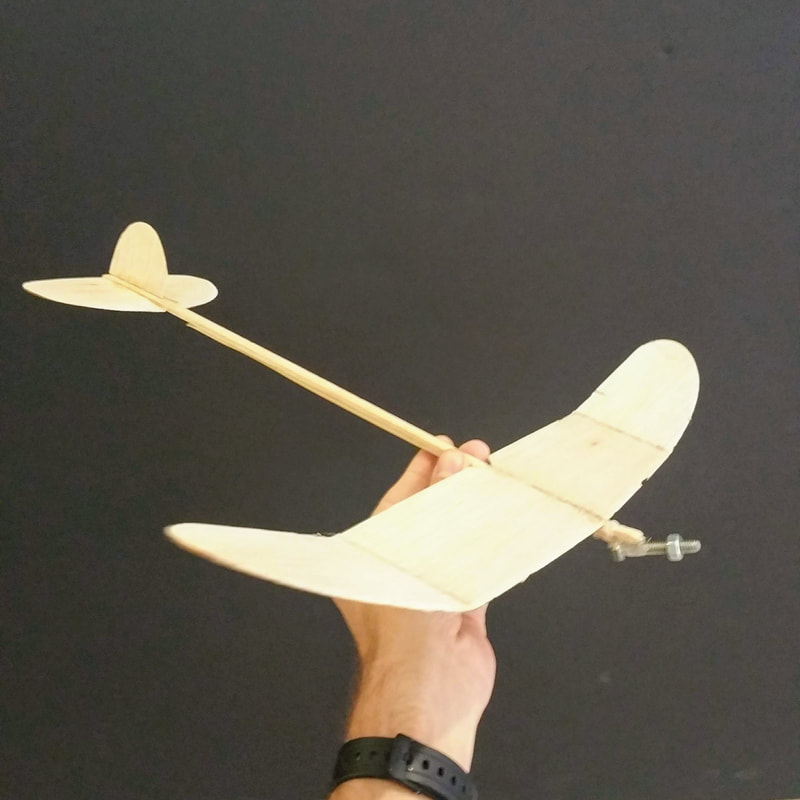
This week we started a new section: Gliders. I gave everyone a cheap glider from Party City and had them assemble it, and measure how well it flew. Then I gave them materials to make better wings and stabilizers, and to add weight. They made a hacked glider that outperformed the first. They then copied their improved design in a glider that they built from scratch.
What worked:
For kites, I had students build the initial models out in pairs. This was ok and let them get great photos of the process work. For gliders, I gave everybody their own to play with. I think that this is a stronger launch because by the end each individual student has had experience with the material and will have their own questions. We also ended up testing more designs with the individual builds, rather than building by consensus. Some of the more crazy designs pushed our thinking about what would and wouldn't work.
What was surprising:
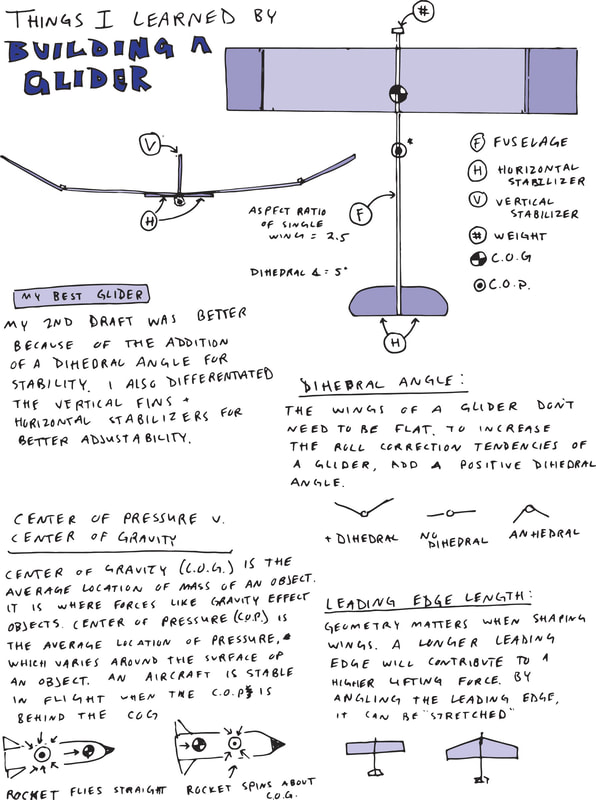
This week I emphasized vocabulary more explicitly. Each day I highlighted new terms relating to flight and glider design. I required that they use these terms in the T.I.L. at the end of the week. The resulting T.I.L.s are pretty strong, but what surprised me was hearing the students use the language in class with me and with each other. Overhearing a students discussion about appropriate dihedral angle or the best camber for a wing is satisfying.
Never again:
With individual gliders seemed to come individual learning. I never had a big sharing moment with the class or let the kids try each others designs. It would have been cool if we set up a mini exhibition where everyone could try out other's gliders and take notes on what worked or didn't work about them. I hope that I don't create isolated learners but explicitly ask the class to share information.
What worked:
For kites, I had students build the initial models out in pairs. This was ok and let them get great photos of the process work. For gliders, I gave everybody their own to play with. I think that this is a stronger launch because by the end each individual student has had experience with the material and will have their own questions. We also ended up testing more designs with the individual builds, rather than building by consensus. Some of the more crazy designs pushed our thinking about what would and wouldn't work.
What was surprising:
This week I emphasized vocabulary more explicitly. Each day I highlighted new terms relating to flight and glider design. I required that they use these terms in the T.I.L. at the end of the week. The resulting T.I.L.s are pretty strong, but what surprised me was hearing the students use the language in class with me and with each other. Overhearing a students discussion about appropriate dihedral angle or the best camber for a wing is satisfying.
Never again:
With individual gliders seemed to come individual learning. I never had a big sharing moment with the class or let the kids try each others designs. It would have been cool if we set up a mini exhibition where everyone could try out other's gliders and take notes on what worked or didn't work about them. I hope that I don't create isolated learners but explicitly ask the class to share information.
Week 6: Partners Make a Glider
This week students paired up to make a larger glider based on what worked for them last week. By combining their experience they should be able to make something great. We went to the gymnasium on Wednesday to test their gliders in a larger space.
What worked:
These partnerships were effective because I started out by giving everyone the individual experience. Because each student had made and messed with their own glider already, they all had perspectives and experience. in other projects that start with partners, it's possible for one of the partners to not have as deep of an initial experience as the other, so that when they shuffle into new partnerships there is an imbalance.
Additionally, like with the kite section, I printed out a bunch of pictures of wing shapes and arrangements from top and front views. I just scattered these around and let kids use them or not. I saw them in the students hands and with notes on them as the week went on so I think they were useful.
What was surprising;
I am in the perfect building for this project because I have a long indoor hallway right outside of my room. The tiles on the floor of this hallway are 12 x 12 square, so it's really easy for the class to get data on their flights. In sharing this project with other teachers, I should emphasize the importance of such a testing space, because some students test each glider iteration 50 times before moving on, and some only throw it once or twice before making changes. If your testing area requires your class to walk somewhere together I think the momentum would not carry. Having a dedicated space allows them to work at their own pace.
Never again:
I don't know why I saved the gymnasium till the second week of this project. It would have been more fun and more of an event for us take their crappy gliders to the gym and then each successive draft to the gym so they could really see the progress they were making. Do the fun stuff first.
Week 7-8: Large Scale Gliders
Final weeks of gliders. Students first identified a global issue and researched solutions. They then evaluated the solutions to see if any were appropriate for a glider-implementation. Finally, they prototyped a glider with the best of what they learned in previous weeks.
What worked:
By this time the class was hungry for knowledge. Gliders are complex because there are many variables, and I genuinely enjoyed giving them tips and tricks to help make their gliders perform better. Some lessons I gave was framed as a trouble shooting session where I would help them identify what was not working in their design, and how they could improve it. This is exactly the position I like to be in as a teacher. When the project requires the content knowledge, everybody's happy.
What was surprising:
I had a few students who still were making gliders that didn't seem to respect anything that makes a effective glider. As much as I tried to give them designs to work from, their progress was incremental. I think I can be more strategic in the way that I scaffold this work and have plans available for student who might be struggling to come up with something original. Though their final designs are improvements over their initial attempts, I think that I could have communicated higher expectations.
Never again.
Balsa wood fuselages. I liked them because they are light and squared so that it's easy to glue parts on at specific angles, but they are simply too fragile. Some students cut fuselages out of plywood for better stability or used the barbeque skewers that I brought in. Even though I did this project myself, I still had things to learn.