
Reuben Margolin - eyeofestival.com
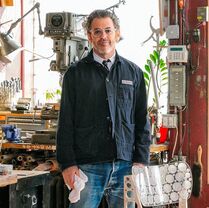
Tom Sachs - architecturaldigest.com
|
Recently I have found myself very interested in the work of Reuben Margolin and Tom Sachs. They both have something to say about the power of imitation. RM makes sculptures that imitate natural motions, like waves and clouds. TS's work involves recreating something he admires as a way of understanding and owning it. Both men have ridiculous work ethic, very rarely cutting corners. I haven't seen work of either of theirs where some mechanism is hidden or a process skipped. What you see is what you get in their work.
I was inspired by the aesthetic of TS's work. He does not polish his work in the usual sense, choosing instead to leave "scars of production". "All the steps that led up to the end result are always on display". To cover up mistakes or pencil marks is a sort of dishonesty to TS. He frequently talks about his first sculpture, made in elementary school, which was of an expensive camera his father wanted to buy. TS made a clay version of the camera at school and brought it home. It was his way of possessing an item that was out of reach. RM makes sculptures in a very analog way. Usually it is assumed that the forms he creates are controlled by stepper motors and computer code. Rather, he creates physical mechanisms to generate the motions that he has in mind which to me is more interesting. He has said that he is not trying to copy natural motions but to imitate them, and that nature is both a mysterious and ordered thing. |
|
I don't remember when I first saw Reuben Margolin's TED Talk, I've since watched and re-watched it more than 10 times. I like the way he tells stories and how low key he is about the large amount of work he's completed. The concept of modeling motion from nature using math was immediately appealing to me, and I began sketching ideas in my notebook.
The drawing at right was my favorite idea that I came up with. I wanted to emulate the motion of grass blowing in the wind by having these little pins be pushed by a conveyor belt below. My prototypes were not worth mentioning and I quickly got frustrated, because at that point in my life I had only built shelves and picture frames. A wooden machine like this had a lot of skills embedded that I hadn't yet learned. The project languished and I forgot about it until I was showing another teacher the Rotational Volumes project. We were saying how curved lines make for interesting math applications. I had enjoyed that project because of the combination of math and woodworking required to complete it. This brought me back to RM's TED talk. Now with a little more experience, I recognized that the best way for me to learn about his sculpture would be to try and make one myself. Tom Sachs would be proud. I believe this model wave (at right) was made specifically for the TED talk. It's far more simple than other sculptures he has made and it felt possible for me to try. So using this as a model I set to work on my first prototype. |
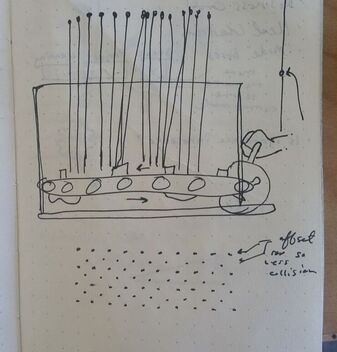
A page from my notebook circa Fall 2017
|
Prototype 1
|
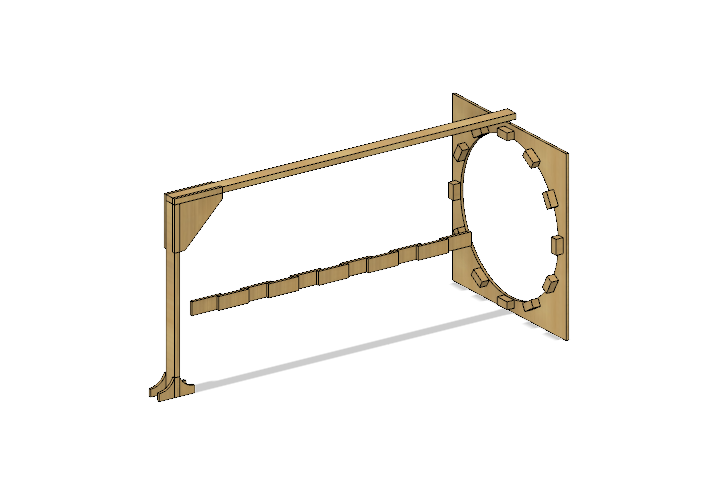
After looking carefully at the example wave generator I made a CAD drawing of it. This was a very precise way to prototype without using any material. I estimated a few dimensions but made this sketch about 1:1 scale. Drawing this model helped me to learn a lot about how this machine works and when I actually went into the shop to build it, I didn't reference my notes at all because I had developed a very clear understanding of the device.
I made the prototype using materials I had on hand because I wanted to get something out into the real world. The X-Carve was useful for cutting a perfect circle out of plywood. I also decided to change the dimensions so that the final piece could sit on a table. I used a height of 20 in which is still a little big, but I was worried that a smaller model would result in wave blocks that were not heavy enough to pull themselves back down to a starting position. |
|
Another reason that I made this prototype was to give my students an example to work from once the class starts. I know that if I only showed them pictures or my eventual final design that I would lose some of them. They won't have a reference point for building something like this, so I wanted to have a straightforward physical model for them to look at on the first day of class. In fact, I think their first assignment will be to replicate my prototype in order to gain a context for this type of machine.
1. What Worked?
This prototype functions much more smoothly that I had anticipated! By making a prototype myself I was able to keep track of exactly what materials are needed and what tools are needed, so I will be able to support my students in making this without much trouble.
2. What was surprising?
I had thought that this would require more complicated math than geometry, but in reality once I picked a height for the whole structure, the rest of the dimensions spawned from that. I didn't need to work with and trigonometry either. This project is mostly about constructions.
3. Never again?
There's no need to use staples as pulleys. They are hard to embed a fixed amount in wood, and they tear up strings over time. Eye hooks are cheap and work much better so I will use those from now on.
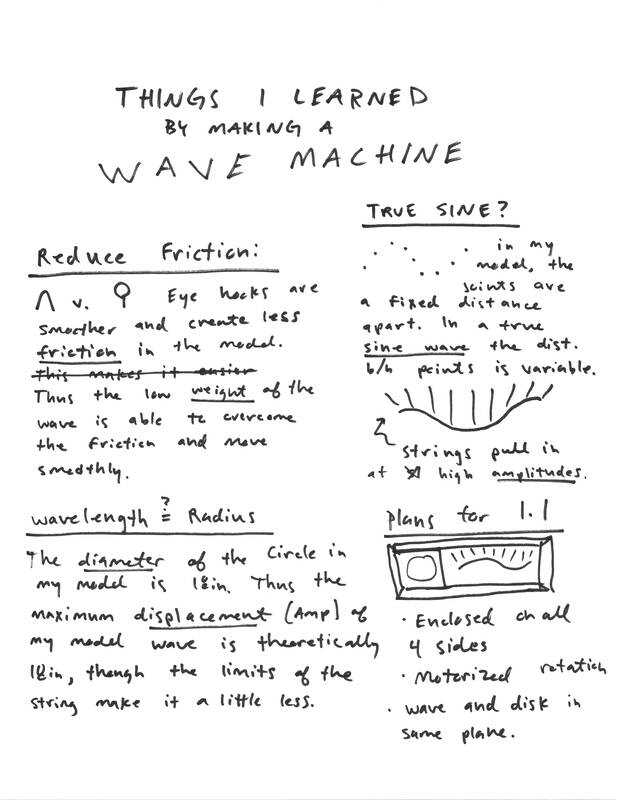
Notes on what I learned by making a prototype. Important terms are underlined as I identify content I will need to teach the class.
|
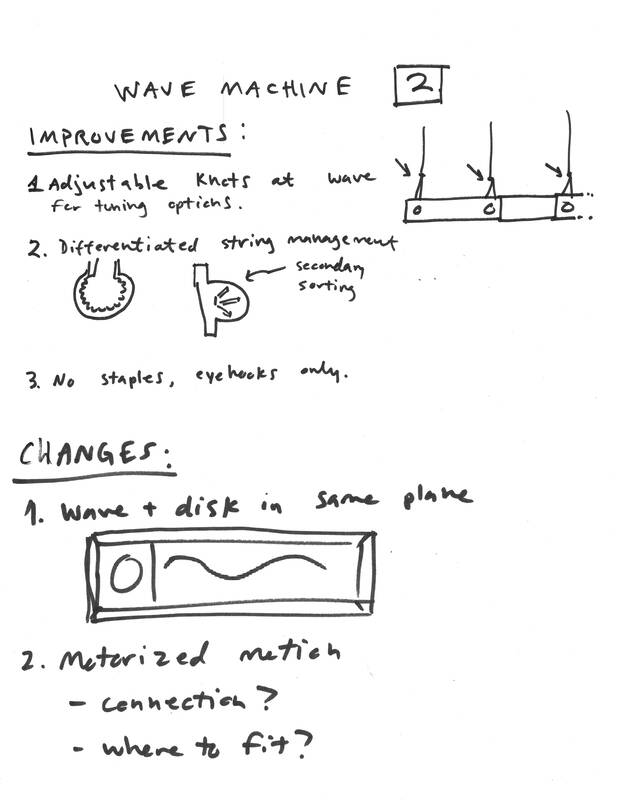
My sketches as I thought about what to change in the next version.
|
Moulage/Modification
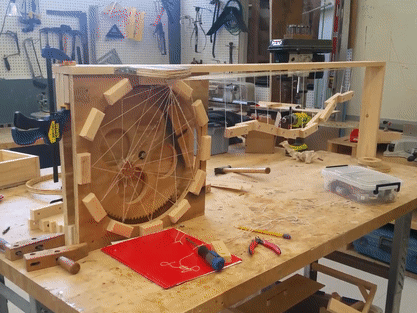
After I finished the first prototype I had a lot of ideas about how I wanted to change it. Some things needed to be improved for functionality, and others I wanted to change just because it would look cool. I had intended for the machine to be powered by a crank, but now knew that a motorized motion would be way more slick. In my drawing above you can see the rectangular drawing that I made when I had the idea to mount the device flat on a wall. It will frame itself and clearly show the transfer of the circle to a wave.
Moulage is a term from dressmaking, where the dress is sewn together directly on a doll with the shape of the intended wearer. Rather than try and tease out the correct measurements and shapes, I prefer to make modifications directly to a physical prototype and then finalize the parts later. On my prototype I replaced the joints with eye hooks and added a motorized wheel system to move the center point on the circle. I also channelled each string through it's own path rather than having them in a bundle together because the motion of the wave is much smoother with less friction. A weird part of this is that since I am intending on showing my students my initial prototype, I needed to replace parts that I was going to change instead of changing them directly on the model. This way is a bit more time intensive, but when the students are working on this project I will have them directly modify their prototypes.
|
1. What Worked?
I'm very happy with the moulage style of building. It's very rewarding and fun, more than CAD. The functional prototype is a thing of beauty as well. 2. What was Surprising? I used 3.5in wide boards for my frame which ended up being the perfect size to fit the rotation mechanism and wheel without protrusion. One of those happy accidents I guess. 3. Never Again? Right when I got the mechanism turning I got really excited and started trying to prototype the actual motor mount. I pulled everything apart and started making cuts without much planning. I destroyed my model and didn't make much meaningful progress. I never want to make cuts into projects like this without purpose or planning. |
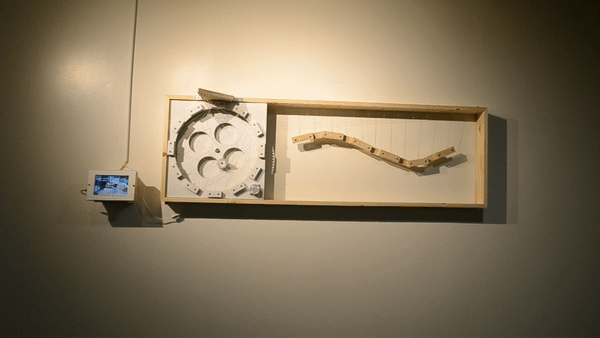
Final Version
|
With my measurements confirmed by the physical model I had made, all that remained was to make the final version out of more permanent material. Using my moulage model as reference, I recreated all the parts and assembled them into a final piece. This was really satisfying because all my planning finally paid off in a well-made piece.
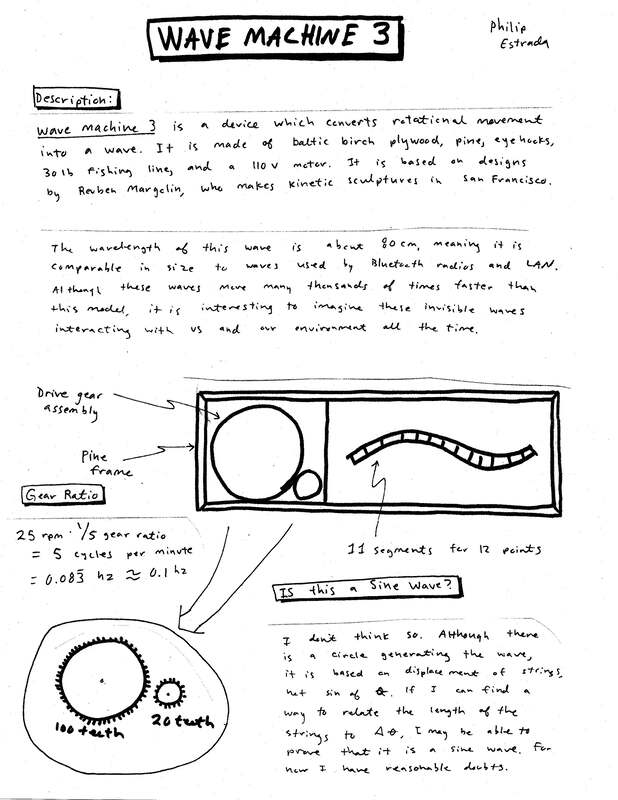
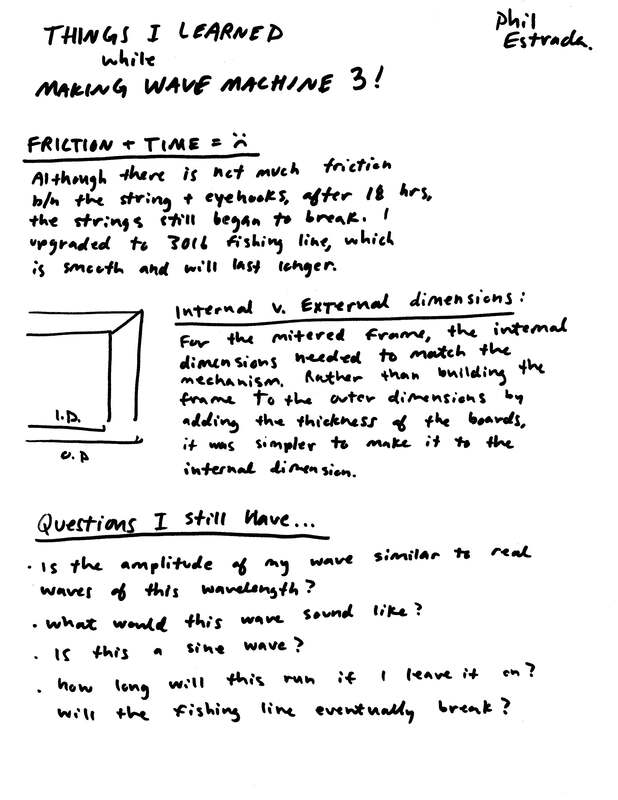
Once finished with the model, I took some measurements of my wave to quantify some of it's qualities. I learned that it has a very slow frequency of 10 hz. If this was a sound wave, it would be too low of a sound to be audible at it's modeled amplitude. Humans generally begin to perceive sounds at 16-32hz. The wavelength of my project, about 90 cm, is somewhere in the range of radio waves used by electronics like WiFi cards and Bluetooth radios. Watching the wave move makes me think about all this invisible light that is constantly bouncing around me in modern life at a scale not that different from my model (though at much higher frequencies) |
|
1. What worked?
The final product completely met my expectations. It is really satisfying to walk down the hall and just watch the wave slowly move around and think about the work that went into it. Following Tom Sachs, I committed to doing the work without cutting corners, and trying to leave the process visible for the viewer to see. Holding myself to my own internal standards of excellence was very rewarding as well.
2. What was surprising?
The string that I was using didn't make it into the final product. After a test run of 18 hours the kite string wore through even though I had reduced the friction by using eye hooks. I was resistant to using fishing line because I wasn't trying to hide the string or disguise it. Eventually I bought the thickest fishing line I could find so that it will take a long time to wear down and catches the light as much as possible. There were a few adjustments necessary to accommodate the fishing line, but nothing major.
3. Never again?
For this project I pre painted the plywood before cutting and assembly because I wanted to expose the material to the shop and let it get a little scuffed and scratched. I'm not sure if this is a never again, but because I'm so careful in the build, there are only a few little scratches on the project, and they look more like mistakes. I still want to deliberately include the sense of hand crafting and making in this project, but I need to reconsider if this is the right way to do that.
So How'd It Go? (post project)
|
It's been 16 weeks and we're done! Exhibition was 2 days ago and I'm extremely pleased with the project and student work. Every student built a prototype and modified that prototype to fit their interests. Most students then made final versions of their designs and exhibited them at our school for the public. The rest participated in projects that supported the exhibition. I'm gonna take a few hundred words and get my thoughts out about how things worked.
|
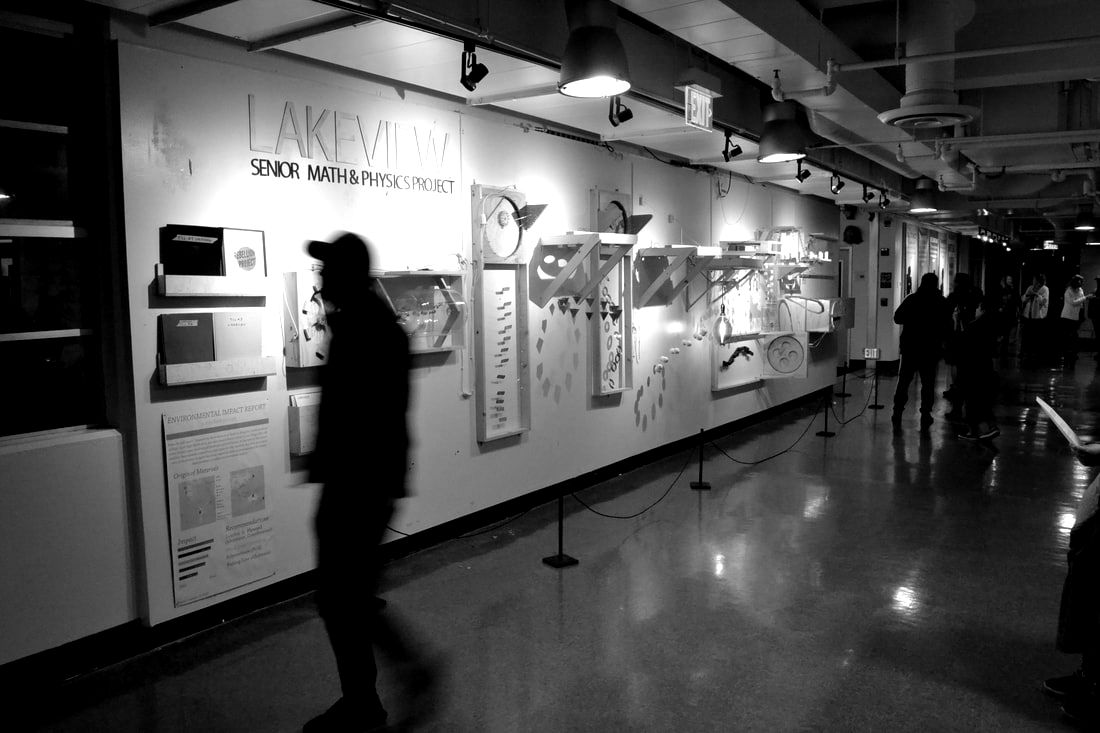
Opening night at our exhibition
|
What worked
I'm fairly happy with the steps I outlined for the students process. By supporting the prototyping and modification process I was able to both build skills with the kids and give them the tools to be creative. I assumed that nobody had experience with the tools and shop, and made everyone go through the process of learning all the ways of building. Because everybody made copies of my prototype in the beginning, I could build skills with the whole class as a group and give demonstrations of the tools and techniques corporately. As the projects diverged, the groups were more autonomous and I could provide them with more specialized instruction. I will always do something like this. Having students make a copy of a physical model should always be the way I start projects.
This semester I worried that I made the constraints for the project too narrow and that students wouldn't have enough leeway to express themselves. There was one structured day where I helped them generate ideas for how to modify their projects after looking at models and examples. I think this was the most impactful day for me because the kids really did great work! They were encouraging and creative and came up with awesome ideas within the constraints I had set out. The designs they came up with were more complex than I anticipated which provided plenty of challenge for all the students. The whole experience really confirmed for me clear and logical constraints make for good student experiences.
Exhibition was awesome too. We finished the project 2 weeks early and were able to slowly put everything in order. There were one or two groups who needed extra time to finish their projects anyway, so it felt natural for them to finish their work while the rest of the class prepped the exhibition space and related material. I think it's super important to finish the project early enough to make exhibition stress free.
What Surprised Me
The knowledge required for the project was about physics and engineering. I know the students learned a lot because they were able to create their projects and complete the work. What was difficult was getting the class to record their learning and knowledge. We attempted to make a book that documented their learning and process of planning their project. I didn't get a lot of buy in for these summaries, and I think that's because they didn't have a real audience. In the future I probably need to display these alongside project pieces as they go up in the school, rather than putting them into a folder.
Never Again
I did not design this project collaboratively. My partner was otherwise occupied during the time that I was prototyping and I wasn't able to involve them in the process. This was a major oversight. We thought that we'd be able to bring our classes together eventually but that didn't happen. Collaboration happens most effectively when both teaching partners are involved in the planning process, otherwise it's too easy to go separate ways during the semester. This sucks during exhibition when students have 2 places to be at once and they often have big due dates in both classes that conflict. For the next project my teaching partner and I are planning together.